

How To Remove Agitator From Speed Queen Washer
Washing Motorcar Repair
Chapter 8
SPEED QUEEN / AMANA
WASHING MACHINES
Notation: Chapter two covers problems common to about all washer designs.
THIS chapter covers only diagnosis and repairs peculiar to late
model Speed Queen / Amana-designed washing machines.
If you practice not read Chapter 2 thoroughly before y'all read this chapter,
y'all probably will not be able to properly diagnose your machine!!!!
Speed Queen washing motorcar has undergone several major blueprint changes in the past few years. Parts for the old (pre-1980) fluid drive machines are by and large not bachelor anymore, and they are no longer economic to repair, and then they are no longer included in this manual. If you have one of these fluid-drive machines, you'd all-time be thinking about getting a new machine.
Raytheon / Amana is notorious for making several pattern changes fifty-fifty inside a unmarried model yr. When ordering or buying parts, it is wise to bring with you the production number, found on the nameplate along with the model number. Might relieve you lot a trip.
Even among the new mode washing machines, in that location take already been two MAJOR design changes. Within the tub, they went from the old-manner agitator mail service and drive block (like to those plant on the sometime fluid bulldoze machines) to a brusk-shaft air-bell agitator connection. (Come across section viii-5) Later, they went from a pump driven by a second chugalug to one mounted straight on the drive motor.
eight-1 BASIC OPERATING SYSTEMS
Belatedly model washing machines have a straight-reversing motor, and the transmission is belt-driven directly off a motor pulley. (Effigy SN-one) Until the early '90's they used a second belt to drive the pump; these are usually referred to in the parts stores as "2-belt" machines. Later on that, the pump was driven direct off the lesser end of the motor shaft; these are commonly referred to every bit "directly bulldoze" washing machines. At that place is merely i chugalug in direct drive machines.
Figure SN-ane: Late Model Drive Train
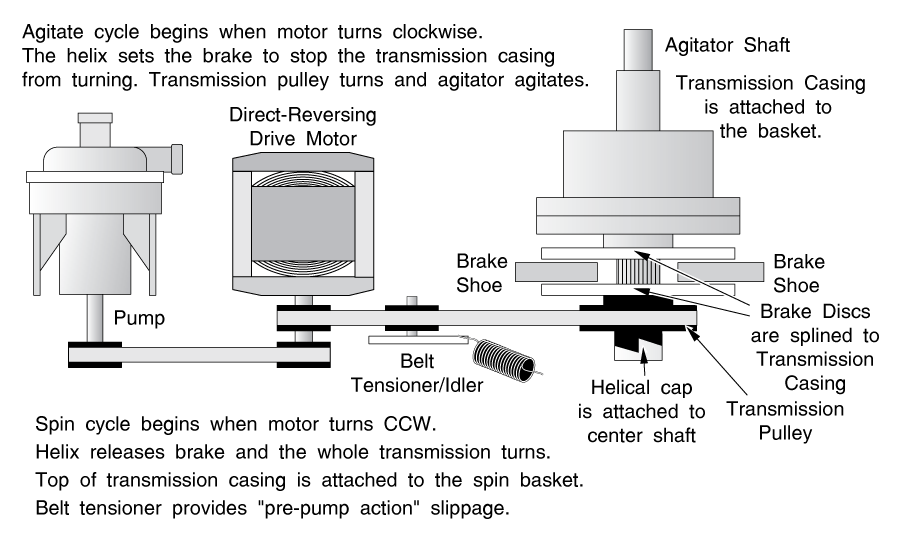
The tiptop of the transmission casing is connected to the basket, and during the spin cycle, the whole transmission rotates. Slippage in the belt, allowed past the tensioner, permits a "pre-pump" action, allowing the basket to come slowly upward to speed.
The bottom of the manual casing is connected to a restriction. This brake is activated by a helix in the hub of the transmission pulley. During the agitate cycle, the brake engages and prevents the transmission casing (and thus the handbasket) from turning. During the spin bike, the helix mechanism releases the restriction and the whole manual spins around.
eight-2 OPENING THE Chiffonier AND Console
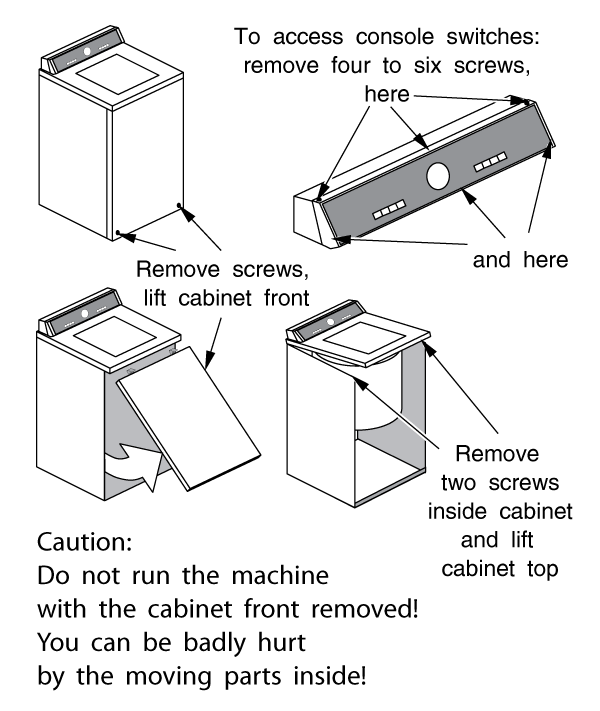
The console or cabinet may be opened as shown in effigy SN-2.
Figure SN-2: Opening the Cabinet and Console
CONSOLE SWITCHES
The timer knob just unscrews from the timer shaft. Nigh other knobs pull straight off their D-shaped shafts. The timer and well-nigh other switches can then be removed by opening the console and removing the switches' terminals and advisable mounting screws or nuts.
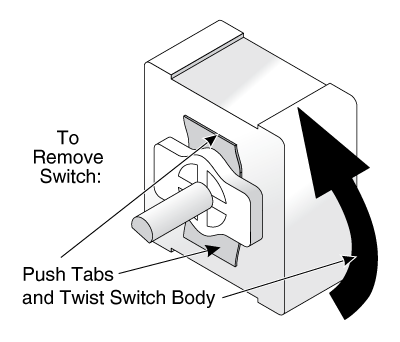
Nonetheless, some switches on belatedly model machines are dissimilar. To remove them from the console, you must printing on the locking tabs next to the shaft (figure SN-3) and twist the whole switch counterclockwise.
Figure SN-three: Late Model Switch Mounting
viii-3 WHAT TYPICALLY GOES Incorrect WITH THESE WASHING MACHINES
The most common problems with these washers are:
SYMPTOM: WATER LEAKS
In "brusque shaft" machines (tardily model machines with a bulldoze bell; see section eight-5) the center tub seal starts leaking. To repair or replace, see department 8-vi.
Another source of h2o on the floor is pump leaks. To replace, see section 8-4.
The basket may be spinning during agitation. This will sling water over the elevation border of the tub and appear to be a h2o leak. Supervene upon the restriction pads as described in section 8-7.
SYMPTOM: NOISY OPERATION
In my opinion, these machines operate a little noisily to brainstorm with. Nonetheless, if they seem a little noisier than usual, check your belt(southward). The audio is difficult to describe; it's kind of a "thunk-thunk-thunk." It happens when the chugalug has a few chunks taken out of it; the belt tensioner/idler starts "bouncing." To check and supercede the belt, see section 8-four.
A "knocking" sound during agitation may be a worn drive block. Run across section 8-half dozen.
SYMPTOM: OIL IN THE CLOTHES
If oil starts showing up in the dress, what has usually happened is that the top transmission seal has deteriorated and is letting water into the transmission casing. The h2o displaces the oil and forces it out through the seal and into the clothes.
If yous desire to keep the machine, the transmission must be replaced. This is a difficult and expensive repair, often costing more than 200 dollars just for parts. You may want to toll out the job before you start and decide whether it might exist more worthwhile to just replace the motorcar. You might besides check out the availability of a rebuilt manual. Come across section 8-7.
SYMPTOM: NO AGITATE, OR NO SPIN
This is normally a broken transmission drive belt. (Section 8-4) Information technology could also be a lacking drive motor. (Department 2-half dozen(e)) or a siezed pump, preventing the motor from turning.
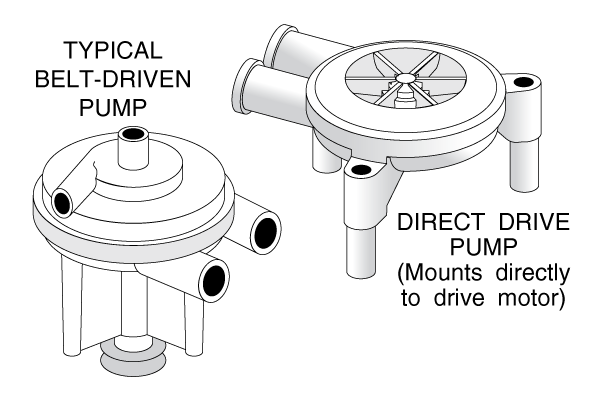
viii-four PUMPS AND Chugalug CHANGING
(Figure SN-iv)
Pumps in the late model machines cannot be rebuilt. They must be replaced if leaking or defective.
TWO-Belt MACHINES
Belt driven pumps are replaced past simply removing the pump mounts.
Tension is kept on the pump belt by adjustment. Tension is kept on the transmission belt past an idler caster. In that location is a kit bachelor from your parts dealer with a new belt and idler and instructions on how to adjust the belt.
Figure SN-4: Pumps
In two-belt machines, yous can adjust the pump belt by loosening the pump mounting plate bolts and moving the pump until yous have well-nigh ane/2-inch deflection with moderate finger force per unit area (most 1 to 2 pounds.)
DIRECT DRIVE MACHINES
Pump or belt changing on a direct drive machine is a little trickier. To do either the pump or belt, y'all must remove the motor platform. First, unplug the motor electrical harness block from the motor. Release belt tension by slipping the belt off the transmission pulley. Disconnect the hoses from the pump. (H2o volition run out, so accept a towel handy!) You can and then remove the four motor platform mounting screws, and rock the motor and pump associates out. When y'all get it out, flip it upside down to work on the pump. (Effigy SN-5)
Figure SN-5: Direct Drive Pump and Motor Mount
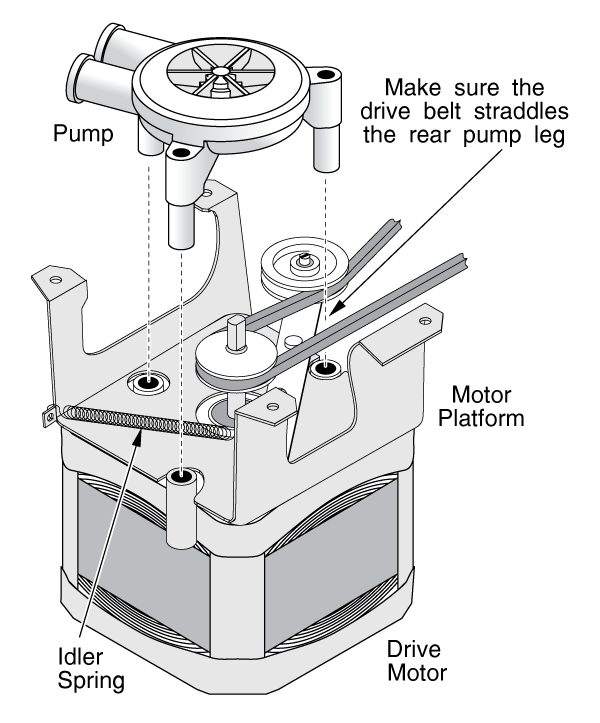
Remove the screws mounting the pump to the motor. Sometimes the pump tin get siezed upwards pretty skilful on the motor shaft and make the pump hard to remove. Do not whack it; steady firm musclepower will get it off. Wiggle it just a trivial if yous must.
When you put the new pump back on the motor, make sure the belt goes around the pulley and straddles the rear pump mounting leg. (Effigy SN-5) Attach the motor platform to the baseplate using the four motor mounting screws. Make sure the belt is positioned inside the idler, and slip the belt around the transmission caster. And so connect the hoses and motor wiring harness.
8-v AGITATOR Attachment: Bulldoze Cake OR Bulldoze BELL
Please annotation that two unlike methods were used to mount the agitator in these machines. Please read this unabridged section and determine which you take earlier trying to remove the anarchist, or you may impairment the machine, or fifty-fifty yourself!
Early on TWO-Chugalug "LONG-SHAFT" MACHINES
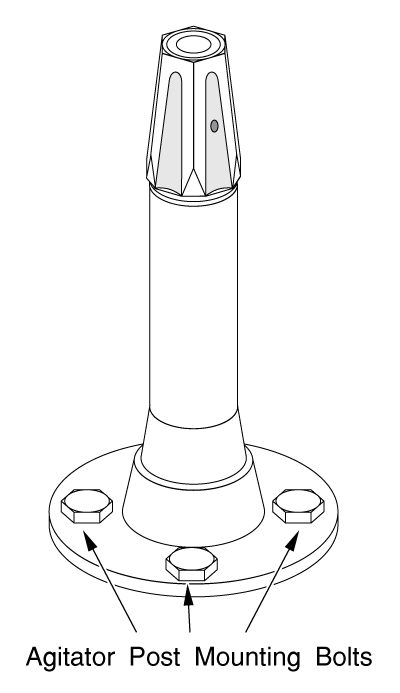
The early on ii-chugalug machines had an agitator post and drive block. (figure SN-6) In these, you remove the agitator by unscrewing the hold down cap and lifting it out. Yous must remove the whole anarchist post to go out the agitator shaft and bulldoze cake. (Figure SN-7) Remove the four bolts at the base of operations of the agitator post and elevator out the post. A circlip on the bottom of it holds the shaft in place. Remove it and the shaft will slide out of the post. Exist careful not to damage the water seal inside the mail when removing or installing the shaft.
When installing the post, be sure to use a new base of operations gasket; it is one of the seals that keeps water away from the height of the manual.
Figure SN-6: Drive Cake (Long Shaft Machines)
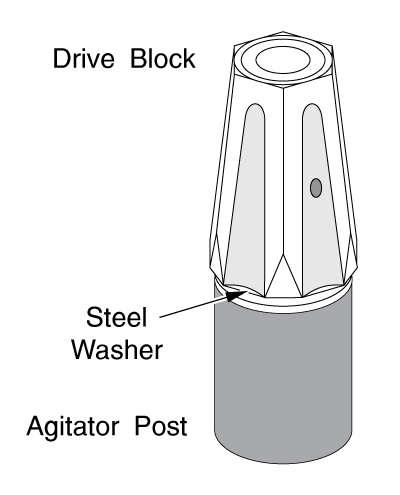
Figure SN-7: Anarchist Postal service
Drive Bell OR "SHORT SHAFT" MACHINES
In later machines, the agitator merely snaps onto a "drive bell." There is no screw cap property the agitator on in these machines. To remove this anarchist, the factory recommends a special tool. I have found it just equally piece of cake to take your belt off, slip it around the underside of the agitator and tug sharply upwards on the belt. (If y'all're thick enough, similar me!) (Figure SN-8) Position the belt below the agitator vanes to avoid breaking the agitator. Be careful when y'all do this, or the agitator may hit yous in the confront when information technology pops off!
Figure SN-8: Agitator Removal and Drive Bell
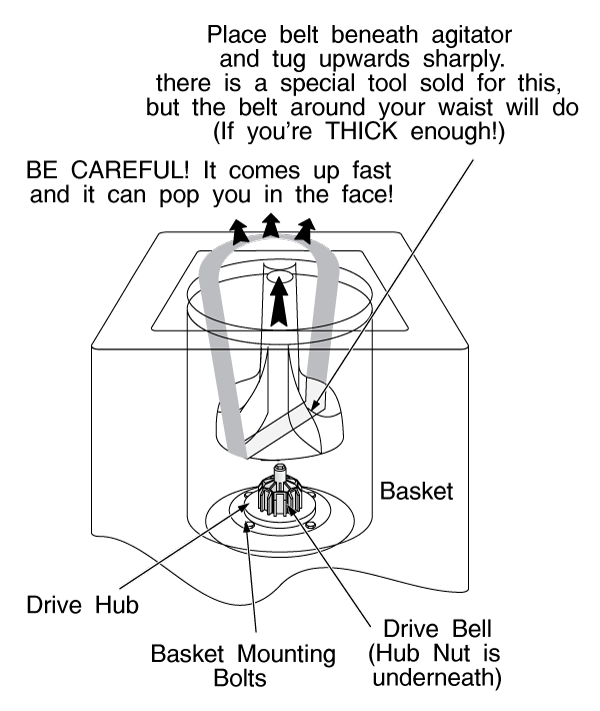
Once you've got the anarchist off, you'll encounter the small plastic drive bong. (figure SN-8) This drive bell serves a couple of different functions. Information technology connects the agitator to the agitator shaft of the transmission. It also traps air beneath it and keeps h2o away from the seal and out of the manual. In that location is an "O"-ring around the drive bell mounting screw, and/or a safe plug that plugs the top of the drive bell, that seals the air inside the drive bell. Information technology is critically important that this "O"-ring or plug be in skilful condition or water will get into the transmission and ruin information technology. Whenever you remove the drive bell screw, supercede the "O"-ring or plug.
Once y'all remove the mounting screw, the bulldoze bell can exist difficult to get off. If you can't get information technology off past hand, you have a couple of options. The factory sells a special puller; however, since a new drive bong comes with the seal kit, I've found that information technology's cheaper and easier to chisel off the old drive bell. With a cold chisel, just cut two slots along the hub of the drive bell to loosen it from the splined shaft beneath. Exist careful not to chisel anywhere near the screw threads, or y'all might impairment them.
Beneath the drive bell is a water seal. To remove it, pry up on the bottom of this seal with a screwdriver. The factory has a special tool to install information technology evenly, but if you're careful, you can do it by hand. Use some liquid dishsoap to lubricate it. The new seal kit comes with pretty thorough instructions.
eight-6 BASKET REMOVAL AND TUB H2o SEAL REPLACEMENT
If you are replacing the tub water seal, make sure you become the upper seal kit and replace it, too. Information technology may exist included with the lower seal kit; merely make sure it's there.
Start, remove the agitator and agitator mail associates, or the drive bong and seal, every bit described in department eight-5. Using a screwdriver, popular the tub band clips holding the plastic tub ring to the summit of the tub, slowly lifting up on the tub ring as you piece of work your way effectually it. Remove the tub ring. Note the locator tabs in the ring and slots in the tub for reinstallation. Always supersede the tub ring gasket; information technology should be included in your new seal kit.
If you just want to check the tub fittings, remove the four (or 8) basket bolts property the handbasket to the drive hub and lift out the basket. Do not remove the hub nut.
If you are replacing the tub h2o seal, y'all will need to remove the drive hub. The hub is held onto the top of the transmission casing by either a hex nut or a spanner nut. Some have locking tabs yous must bend out of the fashion beginning. You should and so be able to turn the nut. There is a spanner available for this, but y'all tin use a pipe wrench. Merely be extra careful non to booger the threads with the pipe wrench; these threads are cut into the top of the transmission casing, and you don't want to accept to buy a new transmission.
The h2o seal is beneath the drive hub. Note advisedly the order and orientation in which things come off; there are some models out at that place with an parts that are slightly different than shown in Figure SN-nine. E'er replace used gaskets or seals.
Figure SN-nine Drive Bell, Drive Hub and Seals
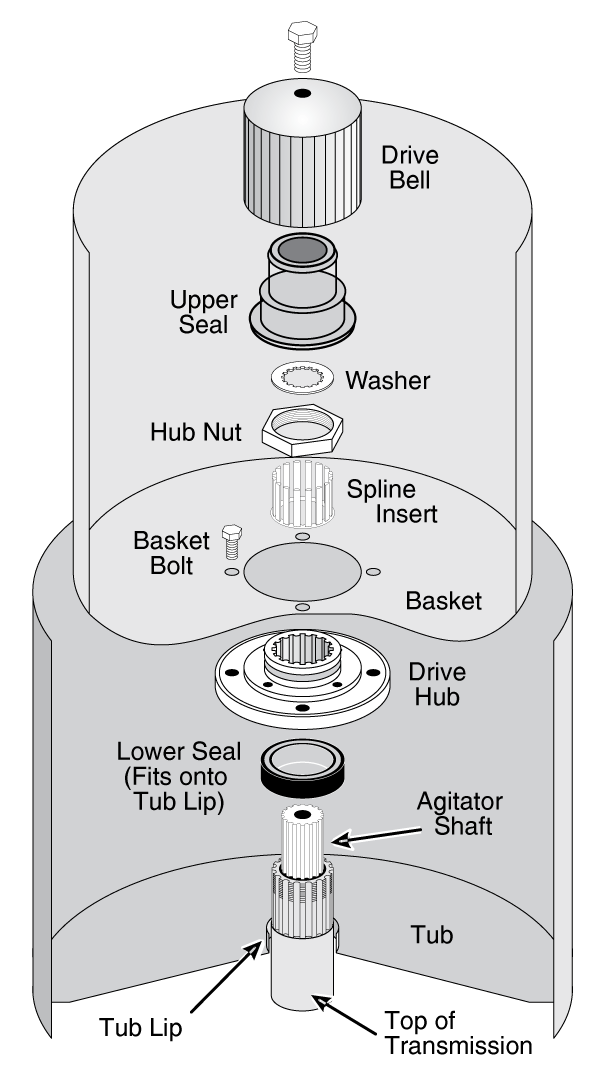
There are a couple of surfaces to put sealant and lubricant on in replacing the water seal; the seal kit contains these. There is also a spline insert and a stainless steel sleeve to arrive the right place. (The fingers of the spline insert point upward!) The new hub and seal kit for your car comes with instructions for installing the seal; follow them advisedly.
8-7 BRAKE AND TRANSMISSION SERVICE
If you just need to supersede the brake pads, it is possible (but hard!) to do so without removing the module from the car. The problem is holding the transmission and getting a good grip on and turning the pulley at the same fourth dimension; in one case the brake starts to release, the manual will exist free to plow. And then once you get the brake released, the problem becomes holding it in that position while yous supersede the brake pads. If y'all're going to endeavor, make sure you lot remove the motor platform first to get more room to piece of work.
If you need to replace the transmission or brake disk assembly, or the upper or lower bearings, you will need to remove the tub and transmission module.
To exercise this, first remove the wash basket, hub and tub h2o seal as described in previous sections.
Mark the front side of the tub with a piece of tape, so that you tin can reinstall it more than easily. Remove the 2 forepart levelling springs past unhooking them from the tub. The factory sells a tool for releasing the springs, just you tin can manner one out of a coathanger, or merely remove one of the front springs and utilise the hook on it to remove the other springs.
When yous've got the springs off, disconnect the pressure hose from backside the tub. Rock the tub forward and out of the machine and flip the module upside downward.
(Notation: Practise Non lubricate the pivot friction pads! Any lubrication on the friction pads will crusade the machine to trip the out-of-rest switch too easily!)
Disassembly of the module is pretty straightforward; come across effigy SN-10. However, there are 1 or two tips and tricks:
Figure SN-10 Module Assembly
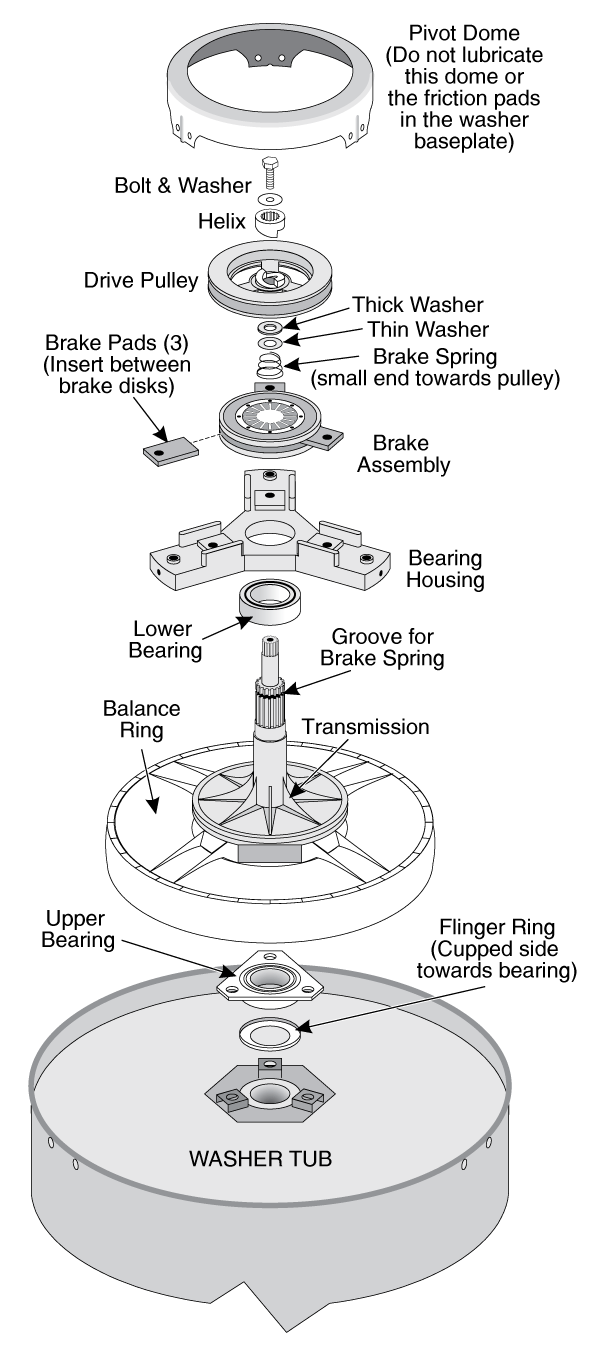
The brake spring must be seated in the notch in the transmission casing. The factory makes a special tool for this; withal, it is possible (but hard) to get the bound on with a couple of apartment-bladed screwdrivers. It'southward your call. I say buy the tool if it'south bachelor.
Coat all transmission surfaces that contact the upper and lower bearings with an anti-sieze compound. Make sure you lot marker the position of the balancing band when you remove information technology from the transmission, so that y'all can get it dorsum on the new transmission in the same style.
NOTE: Module assembly is pictured upside-downwardly; this is the fashion you volition have it when disassembling it!
Too Annotation:
There were many different washing automobile models made of this basic design! Some had variations of the parts you see here. For example, in some earlier models, a needle bearing was used in place of the thick and thin washers. In others, a loving cup-shaped drive pulley was used. When disassembling, Note carefully the order and orientation of the parts you remove (draw pictures or have notes if you must!) and so you can get them back on the same way.
Please share our .

How To Remove Agitator From Speed Queen Washer,
Source: https://www.appliancerepair.net/washing-machine-repair-8.html
Posted by: bakeranney1962.blogspot.com
0 Response to "How To Remove Agitator From Speed Queen Washer"
Post a Comment